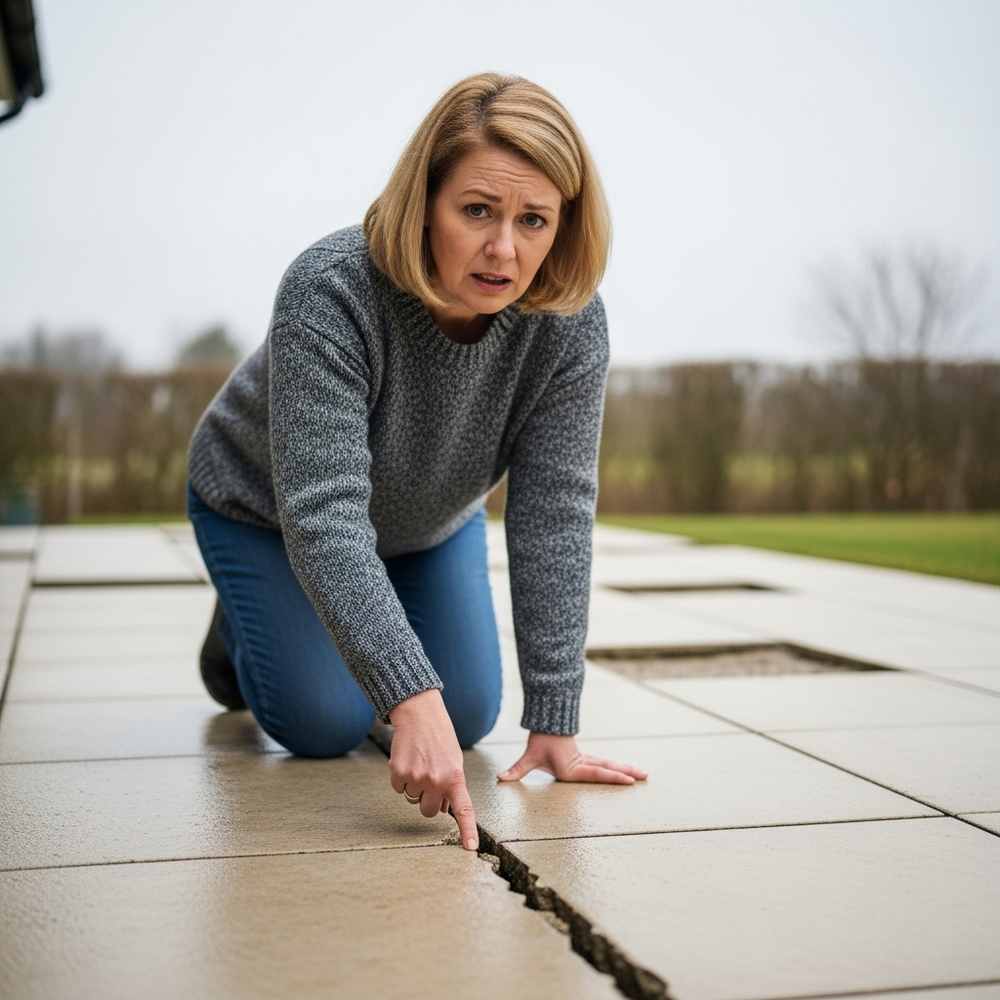
Six months passed before your dream patio—the one you planned and financed—failed. You hired a landscaper to replace an outdated garden and boost your home’s value. The project aimed to improve curb appeal and resolve a known drainage problem caused by subsidence. You approved the design, selected materials, and agreed on the price. At first, the patio looked perfect. Now laminated tiles lift, sections sink, and rainwater pools on the surface. This problem represents a significant, costly failure that demands answers.
This guide helps homeowners in your position. It explains how poor sub-base preparation—such as insufficient crushed stone or compacted sand—causes tiles to shift. It describes how incompatible surface materials lead to cracks and standing water. You will learn to inspect your patio, determine your legal rights, and choose an effective repair plan. You invested in lasting quality; this guide provides the steps to restore your patio.

George is a seasoned interior designer and property marketing strategist with over 13 years of experience. He specializes in transforming properties into visually stunning spaces, helping clients recognize the potential and beauty in each property. With an impressive international client base of exciting projects throughout Europe and America.
A patio gone wrong typically involves structural failures like sinking or shifting, surface degradation including tile delamination, or drainage problems caused by improper sub-base preparation or poor workmanship. Identifying the root cause is the first step toward a lasting solution and holding the contractor accountable.
Patio Construction Failures: Material vs. Workmanship Issues
When a new patio begins to fail, the problems almost always trace back to two fundamental categories: the materials used or the quality of the workmanship during installation. Distinguishing between these two is the critical first step in diagnosing your patio disaster and determining the right course of action. A patio gone wrong isn’t just bad luck; it’s a technical failure.
A patio gone wrong refers to hardscaping projects that develop significant problems months after installation, often due to inadequate sub-base preparation, poor drainage design, or inappropriate material selection. These latent defects point to deeper issues than simple wear and tear.
Common Signs of Structural Failure (Sinking, Shifting, Heaving)
Structural failures are the most alarming signs of a problem because they indicate the foundation of your patio is unstable. These issues will only worsen over time.
Sinking and Subsidence: You’ll notice distinct low spots where one or several pavers are lower than the surrounding area. Water will pool in these depressions. This is often a direct result of a poorly compacted sub-base that couldn’t support the weight above it.
Shifting and Spreading: The lines between your pavers may widen, or the entire patio may seem to be expanding. This happens when there isn’t adequate edge restraint (like a concrete bond beam or heavy-duty plastic edging) to hold the pavers in place.
Heaving: This is the opposite of sinking, where sections of the patio push upward. Heaving is most common in climates with freeze-thaw cycles. Water penetrates the sub-base, freezes, expands, and forces the pavers up. This is a classic sign of both poor drainage and an insufficient sub-base depth.

Surface Degradation: Delamination, Spalling, and Cracking
Surface issues relate to the pavers or tiles themselves. While sometimes this is a material defect, it’s often linked to using the wrong type of material for your climate or improper installation.
Delamination: This is when the top layer of a material peels or flakes away. It is particularly common with materials not designed for exterior use, such as the laminated tiles mentioned in the user’s scenario. The layers separate due to moisture penetration and temperature changes.
Spalling: Similar to delamination, spalling is when the surface of a paver or concrete breaks off into small pits or pieces. It’s often caused by moisture absorption followed by a freeze cycle or the use of de-icing salts.
Cracking: Hairline cracks can sometimes be cosmetic, but larger, structural cracks that run through multiple pavers or a concrete slab are a major red flag. They can indicate immense stress from an unstable base below.
How to Distinguish Material Failure from Poor Workmanship?
Discerning the culprit behind your patio problems is key to your next steps.
Here’s a simple diagnostic guide:
- If the problem is widespread and uniform: For instance, if nearly all the pavers are spalling or delaminating in the same way, it could point to a defective batch of materials. However, it can also mean the wrong type of material was used for the entire project—an error in judgment that falls under workmanship.
- If the problem is localized to specific areas: Sinking in one high-traffic area, heaving near a downspout, or shifting along one unsecured edge are classic indicators of poor workmanship. These demonstrate a failure in a specific part of the installation process, like targeted compaction or drainage management.
- Check the project specifications: Review your contract. Did the landscaper install the material that was agreed upon? If you approved “laminated tiles” for an outdoor project based on the contractor’s recommendation, the fault lies in their professional duty to guide you correctly. A qualified professional should know which materials are suitable for exterior applications.
In the majority of cases where a patio fails within the first year, poor workmanship is the primary driver, especially when structural issues like sinking and heaving are present.
Sub-base Preparation in Patio Longevity
The long-term success of any patio is built on a foundation you can’t see. The sub-base—the layer of compacted aggregate beneath the pavers—is arguably the most critical component of the entire structure. When a contractor cuts corners here, failure isn’t a matter of if, but when. For homeowners dealing with a sinking or heaving patio, the problem almost certainly began here.
Why Improper Sub-base Preparation Causes Long-term Problems?
The sub-base has two main jobs: providing a stable, unmoving platform for the pavers and helping drain water away from the surface. An improperly prepared sub-base fails at both. It creates a domino effect:
- Poor Load Distribution: A shallow or poorly compacted base cannot evenly distribute the weight of the pavers and any foot traffic or furniture. This leads to concentrated pressure points, causing the soil underneath to compress and the pavers above to sink.
- Water Entrapment: Without the correct depth and type of aggregate, water doesn’t drain through. Instead, it gets trapped within the base layers. In warmer weather, this saturated base becomes soft and unstable. In winter, it freezes and expands, causing heaving.
- Soil Integration: In areas with clay soil, which expands and contracts dramatically with moisture changes, a deep and stable sub-base is essential to create a buffer between the pavers and the volatile soil. A shallow base allows the soil’s movement to transfer directly to your patio.
This is a clear symptom of ‘Poor Workmanship’. A qualified contractor knows that the longevity of their work depends entirely on the quality of the sub-base. Skimping on excavation depth or compaction time is a deliberate choice to cut costs at the homeowner’s future expense.
Required Sub-base Depth for Different Soil Types
There is no one-size-fits-all answer for sub-base depth. It must be adapted to the local climate and soil conditions.
Sandy or Gravelly Soil (Good Drainage): A standard depth of 4 to 6 inches of compacted aggregate is often sufficient in areas without deep frost.
Clay Soil (Poor Drainage): This is where many contractors fail. Clay holds moisture and is prone to expansion. For a pedestrian patio on clay soil, a minimum sub-base depth of 6 to 8 inches is required. For areas with heavy frost or vehicular traffic, this can increase to 12 inches or more.
Subsidence-Prone Areas: In areas with known ground movement or subsidence, the sub-base is even more critical. A deeper, reinforced base, sometimes incorporating geotextile fabric for stabilization, is necessary to “float” the patio over the less stable ground.
How Inadequate Compaction Leads to Heaving and Shifting?
Simply digging a trench and pouring in gravel is not enough. The sub-base material must be compacted in layers (called “lifts”) to create a dense, interlocking, and stable foundation.
- The Process: A proper installation involves adding 2-3 inches of aggregate, then compacting it with a heavy plate compactor until it is solid. This process is repeated until the desired depth is reached.
- What Goes Wrong: A negligent contractor might dump all the aggregate in at once and make a few quick passes with the compactor. This only compacts the top layer, leaving the material below loose and full of air pockets.
- The Result: Over a few months, water, gravity, and the weight of the patio cause this loose aggregate to settle. This “post-installation settlement” is what you see as sinking and shifting pavers. This is not a natural process; it’s a direct failure to follow industry-standard construction practices.
Drainage Solutions for Patios on Subsiding Properties
Building a patio on a property with a history of subsidence presents a unique and significant challenge. It elevates the importance of drainage from a standard best practice to the absolute cornerstone of the project.
When a landscaper fails to account for pre-existing ground movement and water management issues, the new patio isn’t just at risk of failure—it can actively worsen the home’s foundational problems.
How Pre-existing Subsidence Affects Hardscaping Projects?
Subsidence means the ground beneath your home is sinking or settling, often unevenly. This can be due to soil composition (like clay), water table changes, or nearby excavation. Introducing a large, non-porous surface like a patio without proper planning can have severe consequences:
- Altering Water Flow: A new patio changes the way rainwater is absorbed into the ground around your home. If not designed correctly, it can concentrate water against your home’s foundation, exacerbating the very soil moisture issues that contribute to subsidence.
- Differential Settlement: The ground under the patio and the ground under your house may move at different rates. An improperly designed patio can crack, pull away from the house, or, worse, direct water toward the foundation, leading to further, more dangerous settlement.
- The Patio as a Symptom: If your new patio is sinking, it might not just be a poor sub-base; it could be a sign that the underlying subsidence is more active than previously thought, a factor the contractor should have considered.
The impact of pre-existing subsidence on hardscaping projects cannot be overstated. It requires a higher level of planning and execution than a standard patio job.
Proper Drainage Design for Properties with Foundation Issues!
On a property with subsidence, the primary goal of patio drainage is to capture water and move it safely away from the home’s foundation.
- Correct Slope: A patio should never be perfectly level. It must have a minimum slope of 1/4 inch per foot (or about a 2% grade), directing water away from the house. A contractor using a simple level without calculating this grade is setting the project up for poor water management.
- French Drains: In many cases, simply sloping the patio isn’t enough. A French drain—a perforated pipe in a gravel-filled trench—should be installed along the edge of the patio (especially the edge closest to the house) to intercept water and carry it to a safe discharge point.
- Channel Drains: For larger patios or areas with significant runoff, a channel drain (a grate-covered trench) can be installed directly into the patio surface to capture water and pipe it away.
- Permeable Pavers: In some situations, using permeable pavers that allow water to pass through them into a specially designed deep aggregate base can be an effective solution, as it dissipates water over a large area rather than concentrating it.
Water Management to Prevent Pooling and Runoff Problems
Effective water management goes beyond the patio itself. It involves looking at the entire landscape.
- Downspout Integration: A common mistake is allowing roof downspouts to discharge directly onto or next to the new patio. This introduces a massive volume of water that can overwhelm the sub-base and cause localized sinking. Downspouts must be routed into solid, underground pipes that carry water far away from the patio and foundation.
- Grading the Surrounding Yard: The lawn or garden beds around the patio should also be graded to slope away from the hardscaping, preventing water from running back onto the patio surface.
- Preventing Pooling: The appearance of standing water (pooling) is an undeniable sign of a problem. It indicates either an incorrect slope or a sinking section. This is not just an aesthetic issue; it accelerates material degradation and is a clear indicator of a patio drainage system failure.
For a homeowner who hired a contractor specifically to help address drainage and subsidence, a failure in this area represents a fundamental breach of the project’s core purpose.
Material Selection Mistakes: Why Laminated Tiles Fail Outdoors?
The choice of surface material is where the vision for a patio comes to life. But it’s also where critical, project-defining mistakes can be made. When a contractor recommends or uses materials that are fundamentally unsuited for outdoor, horizontal applications, they are introducing a guaranteed point of failure. The case of laminated tiles on an exterior patio is a perfect example of this.
Are Laminated Tiles Suitable for Exterior Patios?
The answer is an unequivocal and absolute no. The relationship between selecting inappropriate materials (laminated tiles) and long-term durability issues is direct and unavoidable. Here’s why:
- Composition: Laminated flooring is a multi-layer synthetic product. Its core is typically a high-density fiberboard (HDF)—essentially wood particles and resin compressed together. This core is highly susceptible to moisture.
- How it Fails: When exposed to rain, humidity, and the moisture that naturally wicks up from a concrete slab or sub-base, the HDF core of a laminated tile will absorb water like a sponge. It will swell, warp, and delaminate (come apart in layers). The top “wear layer” and decorative image will peel away from the saturated core.
- Intended Use: Laminate flooring was designed exclusively for stable, dry, interior environments. No reputable manufacturer warranties or recommends its use for any exterior application, especially not a patio.
A contractor suggesting or installing laminated tiles outdoors demonstrates a profound lack of basic material knowledge. This is not a simple mistake; it’s a mark of negligence.
Freeze-Thaw Damage and Delamination in Outdoor Applications
Even with materials designed for outdoor use, like porcelain or natural stone, the forces of nature are relentless. Freeze-thaw cycles are a primary cause of surface degradation if the wrong material or installation method is used.
- Water Absorption: All materials have a water absorption rating. Materials with higher absorption rates will soak in more water during a rainstorm or from melting snow.
- The Freeze: When temperatures drop below freezing, this trapped water turns to ice and expands with immense force (up to 9% in volume).
- The Damage: This expansion exerts pressure from within the tile or paver, causing the surface to pop, flake (spall), or crack. In layered products like laminated tiles, it forces the layers apart, causing catastrophic delamination.
This is why outdoor tiles must be rated as “frost-proof,” meaning they have a very low water absorption rate (typically less than 0.5% for porcelain).
Proper Adhesive and Installation Methods for Porcelain Tiles
To avoid these issues with appropriate materials like porcelain, the installation method is just as important as the tile itself.
- Correct Adhesive: A polymer-modified thin-set mortar specifically designed for exterior use is required. These mortars have additives that give them flexibility to withstand temperature changes and provide a stronger, more water-resistant bond. Using standard interior tile adhesive outdoors is a common shortcut that leads to bond failure.
- Full Coverage: The contractor must ensure full adhesive coverage on the back of each tile (a practice called “back-buttering”). Troweling adhesive with gaps or “dots” leaves voids where water can collect. When this trapped water freezes, it can easily pop the tile off the substrate.
- Grout and Sealing: Using a high-quality exterior grout and sealing the grout lines is crucial. Grout is a primary defense against water penetrating the tile assembly. Cracked or improperly mixed grout is an open invitation for moisture intrusion and eventual failure.
When your patio’s surface is failing, look closely at the material itself. If it’s an indoor product like laminate, the cause is clear. If it’s an outdoor-rated material that’s still failing, the culprit is almost certainly the invisible layer of adhesive and the installation technique used.
Identifying and Diagnosing Latent Defects in Patio Work
One of the most frustrating aspects of a patio gone wrong is the delay. For months, everything can look perfect. Then, slowly at first, the signs of failure begin to emerge.
This phenomenon is known as a latent defect—a hidden flaw in construction that is not apparent at the time of completion but manifests later. Understanding why this happens is key to proving that the failure is tied to the original installation, not subsequent wear and tear.
Why Problems Appear Months After Installation?
Patio failures are often a slow-motion disaster. The underlying causes—like poor compaction or inadequate drainage—need time and exposure to the elements to trigger the visible symptoms.
- Settlement Period: A poorly compacted sub-base doesn’t collapse overnight. It settles gradually under the weight of the patio and with each cycle of rain. It can take a full season, or six months, for the soil and aggregate to compress enough for sinking to become noticeable.
- Seasonal Cycles: The true test of a patio’s durability comes with changing seasons. The heavy rains of spring will test the drainage system. The intense heat of summer can affect certain materials and jointing compounds. The first deep freeze of winter is often the final straw for a patio with trapped moisture, causing heaving and spalling that wasn’t visible before.
- Gradual Water Intrusion: For surface issues like delamination, failure begins with microscopic water intrusion. It takes months of repeated wetting and drying, or freeze-thaw cycles, for that moisture to break down the bond between layers of a tile or the adhesive holding it in place.
These latent defects (problems appearing after months) are insidious because they fall outside the immediate post-job inspection period, but they are direct evidence of foundational flaws in the original construction.
Early Warning Signs of Developing Issues
Before a catastrophic failure, a failing patio will often send out subtle distress signals. Being able to spot these can help you document the issue before it escalates.
- Fine, Sandy Powder in Joints: If you see a fine powder or sand constantly appearing on the patio surface, it could mean the jointing sand is being washed out from below due to poor base stability or incorrect paver interlock.
- A “Hollow” Sound: Tap on your patio tiles or pavers in different areas. If some sound solid and others produce a hollow echo, it suggests the paver has debonded from the substrate below. This is an early warning sign of future cracking or popping.
- Weeds or Ants in the Joints: While a few weeds are normal, a widespread and persistent weed problem can indicate that the joints are loose and the sub-base is unstable, creating a hospitable environment for growth.
- Slight Rocking or Wobbling: Walk across your patio and feel for any pavers that move or “click” underfoot. Even a millimeter of movement is a sign of a compromised setting bed and will worsen over time.
When to Call a Structural Engineer for Assessment?
While a homeowner can spot the visible signs, sometimes you need an independent, expert opinion, especially if you anticipate a legal dispute. Diagnosing latent defects in landscaping work with a formal report can be invaluable.
You should consider hiring a structural or geotechnical engineer when:
- The problem is severe or widespread: If large sections of the patio are sinking or heaving, or if the failure is happening near your home’s foundation.
- Subsidence is a known factor: An engineer can assess whether the patio failure is due to poor construction, underlying ground movement, or a combination of both.
- The contractor disputes their liability: A report from a licensed engineer is impartial, expert evidence. It moves the argument from your word against the contractor’s to a professional assessment of the failure’s root cause. The contractor cannot easily dismiss findings that point to inadequate sub-base depth or violations of building regulations codes.
- You are heading toward legal action: An engineer’s report and testimony can form the backbone of your case in small claims court or arbitration, providing the technical proof needed to substantiate your claim of negligence.
Legal Rights and Contractor Disputes
Discovering that your expensive new patio is fundamentally flawed is infuriating. The focus now shifts from construction to conflict. When your patio project fails, it often escalates into a homeowner-contractor dispute. Knowing your rights is the first step toward a resolution. You are not powerless. Consumer protection laws and contract law provide avenues for recourse when you don’t receive the quality of work you paid for.
Landscaper Negligence and Consumer Rights
The legal concept at the heart of your claim is negligence. In a construction context, this means your landscaper failed to perform their work with a reasonable level of skill and care, resulting in the defects you are now seeing.
Implied Warranty of Workmanship: In most jurisdictions, there is an “implied warranty of good workmanship” or known as Consumer Rights Act 2015 which states that services must be carried out with “reasonable care and skill” and materials must be of “satisfactory quality” and “fit for purpose.”
This means that even if it’s not written in your contract, the law assumes the contractor will perform the job to a reasonable industry standard. Installing an outdoor patio with a sub-base of only two inches or using indoor laminate tiles clearly violates this standard.
Breach of Contract: Your written agreement (even a simple one) likely specified the work to be done. If the patio fails due to issues like sinking or improper drainage, it can be argued the contractor did not deliver the “durable, functional patio” they were contracted to build. This is a breach of warranty or contract.
Consumer Rights: Laws like the Consumer Rights Act (or similar regional legislation) state that services must be carried out with reasonable care and skill. When a patio gone wrong is the result of poor workmanship, it is a clear violation of these rights.
Typical Warranty Periods for Patio Installationss
A crucial piece of evidence will be any written warranty provided by your contractor.
- Standard Warranties: A reputable landscaper will typically offer a written warranty on their workmanship for a period of one to five years. One year is the bare minimum, while more confident installers often offer two or three years, as this covers the patio through multiple seasonal cycles, which are likely to reveal any latent defects.
- Material vs. Workmanship: Be sure to read the warranty carefully. It may cover workmanship (like a sinking sub-base) but exclude the materials themselves, which are often covered by a separate manufacturer’s warranty. However, if the contractor installed an inappropriate material, the failure is due to workmanship, not a product defect.
- If There’s No Written Warranty: Don’t panic. The “implied warranty of workmanship” often still applies. A contractor cannot simply avoid liability by failing to offer a written guarantee. The expectation of professional competence is legally inherent in the service agreement.
When Patio Failures Lead to Small Claims Court?
Your first step should always be to contact the contractor in writing, with photos, and request they inspect the damage and propose a solution. If they refuse, ignore you, or deny responsibility, your next step may be legal action. This often is a precursor to ‘Small Claims Court Litigation’.
Why Small Claims? This track is designed for straightforward disputes with a value of up to £10,000 in England and Wales. The process is simpler and less expensive than a full court case, and it is designed for individuals to use without legal representation, so you typically don’t need a solicitor.
Building Your Case: To succeed, you need to present clear, organized evidence. This includes:
- Your original contract or agreement.
- All invoices and proof of payment.
- Dated photographs and videos documenting the failure over time.
- All written communication (emails, letters) with the contractor.
- Quotes from other contractors for the cost of repair.
- An expert report from a structural engineer (this is highly persuasive).
The Goal: The aim is to get a judgment that covers the cost of repairing or rebuilding the patio to the standard you originally paid for. With strong evidence of landscaper negligence, your chances of a favorable outcome are high.
Repair, Remediation, and Cost Considerations
Facing a failed patio, the financial questions become urgent and stressful. How much will it cost to fix? Is a simple repair possible, or does the whole thing need to be ripped out? And most importantly, who should be paying for it? Understanding your options and the associated costs is the final step in moving from problem to solution.
Cost Analysis: Repair vs. Complete Rebuild
The decision to repair a small section or undertake a full rebuild depends entirely on the root cause of the failure.
- When Repair is Possible: If the failure is localized—a small, sunken area, a few cracked pavers due to an accident, or a poorly installed edge restraint along one side—a targeted repair can be cost-effective. This is usually only viable if the sub-base in the rest of the patio is stable.
- When a Rebuild is Necessary: A complete rebuild is often the only real solution for systemic failures. You cannot fix a fundamental sub-base or drainage problem by patching the surface. A rebuild is required if you see:
- Widespread sinking, heaving, or shifting.
- An incorrect sub-base depth for your soil type.
- Improper slope causing water to pool against the house.
- Use of fundamentally unsuitable materials (like laminated tiles).
Trying to “patch” a patio with a failed foundation is throwing good money after bad. The problems will simply reappear. A full rebuild, while more expensive upfront, is the only way to get the lasting result you wanted in the first place. The patio repair and remediation costs for a rebuild are significant, as they involve demolition, disposal, and starting from scratch.
Methods to Lift and Relay Sinking Patio Sections
If a professional assessment determines that the sub-base is mostly sound and only a specific area has settled, a “lift and relay” can be performed.
- Removal: The pavers in the affected area are carefully removed and set aside.
- Base Correction: The existing sand and aggregate base material is excavated. New aggregate is added, graded correctly, and thoroughly compacted in layers to bring the area up to the proper height.
- Relaying: A new layer of sand is screeded, and the original pavers are relaid and compacted back into place.
- Jointing: The joints are filled with new sand to lock the pavers together.
This process is labor-intensive and requires skill to blend the repaired section seamlessly with the rest of the patio.
Who Bears Financial Responsibility for Corrections?
This is the central question in any homeowner-contractor dispute.
The Contractor’s Responsibility: If the failure is due to poor workmanship, negligence, or a breach of warranty or contract, the original contractor is financially responsible for making it right. This includes the cost of labor and materials to either repair the defect or, if necessary, completely rebuild the patio to proper industry standards.
What if the Contractor Refuses? If the contractor refuses to honor their responsibility, your recourse is the legal system. The judgment from a successful small claims court case would order the contractor to pay you the amount of money required to hire a different, competent contractor to fix the problem. This is why getting quotes for the repair work is a critical piece of evidence.
The Homeowner’s Responsibility: You would typically be financially responsible for repairs needed due to issues outside the contractor’s control, such as damage you caused, normal wear and tear after many years, or an unforeseeable event like a major flood (though poor drainage would still be a factor). However, in the case of a patio failing within months due to the issues discussed, the responsibility almost always lies with the installer.
Related Patio and Landscaping Issues
A patio gone wrong is not an isolated event. The underlying causes—poor drainage and shoddy construction—can have ripple effects across your property, impacting its value and structural integrity. Understanding these related issues is crucial for a holistic solution.
Foundation Water Damage from Poor Drainage: The most serious consequence of a poorly designed patio is the risk to your home’s foundation. If a patio slopes toward your house or has no effective drainage system, it channels thousands of gallons of water directly to the base of your home. This can lead to water in your basement or crawlspace, cracks in the foundation, and can worsen existing subsidence issues. This transforms a landscaping problem into a major structural threat.
Home Improvement Failure Prevention: Your experience serves as a critical lesson in due diligence. Preventing future failures involves a rigorous contractor vetting process. This includes checking licenses and insurance, demanding a detailed written contract specifying materials and base depths, and speaking with multiple recent references. Never choose a contractor based on the lowest price alone; quality workmanship has a cost, and cutting corners leads to the exact problems you’re facing.
Property Value Impact of Failed Landscaping: A beautiful, well-built patio can add significant value to your home. Conversely, a failing one is a major liability. It’s not just an eyesore; it’s a red flag for potential buyers who will see it as a costly repair they will have to undertake. A cracked, sinking patio can detract from your property’s curb appeal and ultimately lower its market value, negating the very investment you intended to make.
Conclusion
The journey from a dream patio to a landscape of sinking pavers and pooling water is a deeply frustrating one for any homeowner. As we’ve seen, these failures are rarely accidental.
They are the predictable outcome of cutting corners, particularly in the unseen but critical areas of sub-base preparation and water management.
Whether it’s the use of wholly inappropriate materials like laminated tiles or a failure to account for site-specific challenges like subsidence, the root cause almost always points back to a lapse in professional workmanship.
Your immediate path forward should be methodical and documented.
Action Items:
- Document Everything: Take extensive, dated photos and videos of all the problem areas. Note where water pools after rain.
- Consult an Expert: For significant issues, consider getting an independent assessment from another reputable landscaper or a structural engineer to diagnose the root cause professionally.
- Communicate in Writing: Send a formal, written notice to your original contractor detailing the failures and requesting a plan for remediation under their workmanship warranty.
- Understand Your Legal Options: If the contractor is uncooperative, familiarize yourself with the small claims court process in your area and gather your evidence.
By understanding the technical reasons for your patio’s failure, you can shift from being a victim of circumstance to an empowered homeowner, ready to advocate for the quality, safety, and value you paid for.
FAQ Section
1. Why is my new patio sinking after heavy rain?
A new patio sinking after heavy rain is a classic sign of a failed sub-base. The rainwater saturates the poorly compacted aggregate and underlying soil, causing it to soften and compress under the weight of the pavers. This indicates the sub-base is either too shallow, was not properly compacted in layers, or lacks adequate drainage to handle the water volume.
2. Can I sue my landscaper for a patio gone wrong?
Yes, you can sue a landscaper for a patio gone wrong, typically in small claims court. The basis for your lawsuit would be breach of contract and/or negligence, arguing they failed to perform the work to a reasonable industry standard. To be successful, you will need evidence such as your contract, photos of the failure, and quotes for repair.
3. Are laminated tiles suitable for exterior patios?
Absolutely not. Laminated tiles are made with a fiberboard core that absorbs water, swells, and disintegrates when exposed to the elements. They are strictly an indoor product. A contractor who installs them outdoors is negligent, and the resulting failure is due to improper material selection, which is a workmanship error.
4. What depth of sub-base is required for a patio on clay soil?
For a standard pedestrian patio built on heavy clay soil, a minimum sub-base depth of 6 to 8 inches of compacted aggregate is required. Clay soil holds moisture and expands/contracts significantly, so a deep, stable base is necessary to create a buffer and prevent movement from transferring to the patio surface. Four inches is not enough for clay.
5. How long should a patio installation warranty last?
A reputable contractor should offer a workmanship warranty of at least one to three years. A one-year warranty is the minimum, but a longer period is a sign of the contractor’s confidence in their work, as it ensures the patio endures several seasonal cycles, which is when latent defects like sinking or heaving typically appear.
6. Is it cheaper to repair or rebuild a damaged patio?
It is cheaper to repair a patio only if the problem is small and localized and the underlying sub-base is sound. If the patio has widespread sinking, incorrect slope, or a fundamentally flawed sub-base, a complete rebuild is the only lasting solution. While more expensive upfront, a rebuild is cheaper in the long run than repeated, failed repair attempts.
7. Do I need a structural engineer before building a patio on moving soil?
Yes, if your property has known issues with subsidence or “moving soil,” consulting a structural or geotechnical engineer is a wise investment. They can assess the soil conditions and recommend specific solutions, such as a reinforced or “floating” sub-base design, that a standard landscaper may not be qualified to engineer. This provides a blueprint for a successful project and can prevent catastrophic failure.