Granny flats, also known as accessory dwelling units (ADUs), are becoming increasingly popular as a way to provide additional living space for family members, generate rental income, or increase property value. This trend is fueled in part by a growing need for flexible housing solutions and a desire to create more multi-generational living arrangements.
Whether you’re considering building a granny flat to accommodate aging parents, provide housing for adult children, or simply create a more versatile living space, careful planning and design are essential. This guide will walk you through the key steps to consider when designing a granny flat in the United States, Canada, New Zealand, and the United Kingdom.
Want to get 3D rendering for your granny flat project?

George is a seasoned interior designer and property marketing strategist with over 13 years of experience. He specializes in transforming properties into visually stunning spaces, helping clients recognize the potential and beauty in each property. With an impressive international client base of exciting projects throughout Europe and America.
Estimated Costs for Building a Granny Flat
Constructing a granny flat requires a detailed financial plan due to fluctuating costs. The average construction expense in the United States is $150,000, while in Canada, it’s $400,000. These are averages; actual U.S. projects range from $130,000 to $180,000, while Canadian projects span $250,000 to over $550,000. The cost per square meter differs; New Zealand has a higher range of $190 – $315 per square foot, compared to the lower end of $75 in the USA. Key cost components include site preparation (60,000 to $100,000 for conversions) permits, and professional design fees, which can range from $300 to $400 per square foot for custom projects.
Smaller custom granny flats generally have a higher cost per square foot. Adding a second story increases expenses by roughly $50 per square foot in the USA or Canada.
Pre-fabricated options offer cost savings by standardizing construction and by offering fixed costs of building and permits.
A logical budget for minor dwelling requires specific analysis of project factors: local labor, material choices, location, building method, and design style. Comparing builder rates is crucial for budget accuracy.
In addition to the construction costs, it’s essential to factor in other expenses, such as:
Site preparation: This may include clearing the land, leveling the ground, and installing utilities.
Permits and fees: Obtaining the necessary permits and approvals from your local government can add to the overall cost.
Professional services: You may need to hire an architect, engineer, or other professionals to assist with the design and construction process.
Landscaping: Adding landscaping features around the granny flat can enhance its aesthetic appeal and privacy.
While the initial investment in a granny flat can seem substantial, it’s important to consider the potential return on investment. A well-designed granny flat can significantly increase your property value and provide a source of rental income. In some areas, a one-bedroom granny flat can rent for upwards of $2,350 per month or add up to $250,000 of equity in large cities with strong rental demand such as New York or LA in the US.
What granny flat kits cost?
If you are not a fan of custom designing, you can buy a granny flat kit and assemble on site. In short, granny flat kit prices can vary wildly. A very small, basic shell kit may be under $30,000, while a large, turnkey option can exceed $200,000.
For example in the UK, granny annex kits can range from £29,000 to £51,000 . For example, a one-bedroom kit from Future SIPs costs between £37,851.60 and £38,845.60, while a two-bedroom kit costs between £45,873.20 and £53,673.60 .
In the US, granny flat kits from companies like Premier Home Kits and Gold Country Kit Homes typically cost between $37,000 and $60,000.
For New Zealand, Latitude Homes offers granny flats starting from approximately $243,000.
Tiny Home HQ has a range of tiny home cabins that could be used as granny flats, with prices ranging from $62,995 to $89,995 .
Remember that these prices are for the kits themselves and don’t include site preparation, foundations, installation, or connection to utilities. It’s essential to factor in these additional costs when budgeting for your granny flat project.
-
Size: The square footage of the granny flat is a primary driver of cost. Larger kits require more materials and labor.
-
Materials: The type of materials used for the frame (steel, timber), siding, roofing, windows, and interior finishes greatly impacts the price.
-
Complexity of Design: Intricate designs with multiple angles, complex rooflines, or custom features will cost more than simple, box-like designs.
-
Inclusions: Some kits are “shell kits,” providing just the basic structure, while others are “turnkey” or “complete” kits including all materials, fixtures, and finishes. The more components included, the higher the price.
-
Manufacturer: Different manufacturers have varying pricing structures, reputations, and build qualities.
-
Location: Geographic location can impact costs, due to shipping fees and local labor rates.
-
Customization: Customizations or modifications to a standard kit add to the price.
-
Finishes: The quality of finishes can affect cost; for example, premium flooring or high end fixtures will add costs.
-
Permits and Approvals: The costs for permits and approvals are separate costs to the kit, and vary per location.
How to work with Local Regulations and Building Codes for Granny Flat?
Once you have a general idea of the potential costs, it’s crucial to delve into the local regulations and building codes that govern ADU construction in your area. These regulations can have a significant impact on the design and feasibility of your granny flat project.
In the United States, zoning laws and building codes vary considerably from one jurisdiction to another. Some communities may have restrictions on the size of ADUs, while others may require owner occupancy or limit the number of occupants.
It’s important to note that there is a growing trend towards easing regulations to encourage granny flat construction as a way to address housing shortages and affordability challenges.
For example, California implemented changes to its ADU laws in 2020 to streamline the approval process and make it easier for homeowners to build granny flats.
In Canada, regulations for granny flats, often referred to as “laneway houses” or “secondary suites,” also vary by province and municipality.
Vancouver, for instance, has gained recognition for its relatively permissive regulations, allowing laneway homes on most single-family lots. In Alberta, building code requirements for secondary suites address specific aspects such as fire safety, ventilation, and egress.
New Zealand, like many other countries, is actively working to simplify the process for building granny flats. Currently, housing in New Zealand is regulated by the Building Act 2004 and the Resource Management Act 1991.
These acts set out rules for construction, alteration, and land use management. The government is proposing changes to streamline the process for building small, self-contained units, potentially exempting granny flats up to 60 square meters from certain consent requirements.
These proposed changes also include specific permitted activity standards related to setbacks, permeable surface area, and building coverage.
In the United Kingdom, planning permission is typically required for building a granny flat (granny annex) from scratch or converting an existing outbuilding. Regulations can vary across different regions of the UK, and it’s essential to consult with local authorities to ensure compliance.
Types of Granny Flats To Consider

Granny flats can be categorized into three main types: in-home, home-extension, and detached. Each type has its own advantages and considerations.
In-home granny flats: These are created within the existing structure of the main house, often by converting a basement, attic, or spare room. They are typically the most affordable option and require fewer regulatory hurdles. They may offer less privacy and independence compared to other types.
Home-extension granny flats: These are additions to the existing home, expanding the living space by adding a new wing or extending an existing room. They offer a good balance of affordability and privacy, but may require more extensive construction work.
Detached granny flats: These are standalone units built separately from the main house, often in the backyard. They offer the most privacy and independence, but are typically the most expensive option and may have more stringent regulatory requirements.
The choice of granny flat type will depend on your specific needs, budget, and the available space on your property.
Designing for Accessibility, Privacy, and Functionality
Once you have a clear understanding of the local regulations and have chosen a granny flat type, you can begin to focus on the design of the unit itself. Here are some key considerations:
Accessibility Features
If the granny flat is intended for elderly relatives or individuals with mobility challenges, incorporating accessibility features is paramount. Universal design principles, which aim to create spaces that are usable by people of all ages and abilities, should be a guiding factor in your design decisions.
Consider incorporating features such as:
Wider doorways and hallways: This allows for easier maneuverability for individuals using wheelchairs or walkers.
Ramps and step-free entries: Eliminate steps and provide ramps for easy access.
Grab bars in bathrooms: Install grab bars in showers and near toilets for added support and safety.
Lever-style door handles: These are easier to operate than traditional doorknobs.
Slip-resistant flooring: Choose flooring materials that provide good traction to prevent falls.
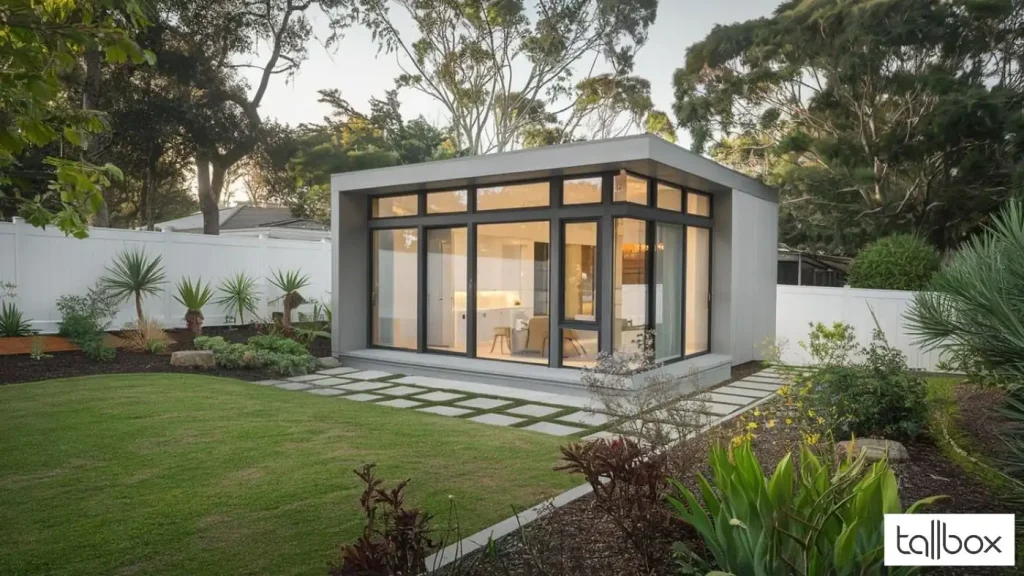
Privacy
Whether the granny flat is for family members or tenants, privacy is essential for both the occupants of the granny flat and the main house. Consider the following design elements to ensure adequate privacy:
Separate entrances: Provide a dedicated entrance for the granny flat to minimize disruptions and ensure independent living.
Soundproofing: Use soundproofing materials in walls and ceilings to reduce noise transfer between the units.
Window placement: Carefully consider window placement to maximize natural light while maintaining privacy.
Landscaping: Use landscaping elements such as fences, hedges, or trees to create visual barriers and enhance privacy.
Functionality
The design of your granny flat should prioritize functionality and efficient use of space, especially given that these units are often smaller than traditional homes. Consider the following:
Open floor plan: An open floor plan can make a small space feel larger and more inviting.
Multi-functional furniture: Choose furniture that can serve multiple purposes, such as a sofa bed or a dining table that can be folded away.
Ample storage: Incorporate built-in storage solutions, such as custom wardrobes and clever cabinetry, to maximize space and minimize clutter15.
Efficient kitchen design: Design a compact and functional kitchen with essential appliances.
Comfortable bathroom: Ensure the bathroom is accessible and includes all necessary fixtures.
When planning the layout and functionality of your granny flat, it’s also important to consider the long-term implications of your design choices. Think about how the space might be used in the future and how your design decisions could affect the resale value of your property.
Best practices for floorspace optimization
-
Prioritize Open Concept Living: Integrate the kitchen, dining, and living areas to maximize space and flow. This creates a more spacious and inviting atmosphere, essential in smaller living areas. A singular living space promotes social interaction for guests or inhabitants.
-
Design for Accessibility and Flow: Ensure a clear, direct entry into the home with easy access to essential areas (bathroom, kitchen). This layout promotes comfortable movement and ease of use for individuals with mobility limitations.
-
Utilize Vaulted and Sloped Ceilings: Employ varying ceiling heights like vaulted and sloped ceilings to create a sense of spaciousness and visual interest. These architectural elements add character and make smaller areas feel less confined.
-
Provide Ample Storage: Incorporate dedicated storage solutions like the entry closet, a mechanism/linen area, and bedroom closets. This ensures sufficient storage space, which is crucial in smaller dwellings. Storage solutions must be both functional and accessible.
-
Incorporate Flexible Spaces: Include a den/flex area that can be adapted to different needs (office, guest room, hobby area). This adds versatility to the floor plan, accommodating varied living situations.
-
Ensure Adequate Natural Light: Install multiple skylights to enhance the interior with ample natural light. Natural light reduces the need for artificial illumination, making the area more energy efficient and inviting.
-
Separate Private Areas: Create a clear separation between the living spaces and the more private areas (bedroom). This layout provides a degree of privacy for residents and guests.
-
Bathroom Proximity: Locate the bathroom close to the entry and bedroom. This provides convenience for both daily use and visitors.
-
Functional Placement of Appliances: Place the washing machine and dryer near the bathroom to ensure it can be a hub for laundry functions. Ensure all the plumbing is near each other.
-
Consider a Fireplace: Adding an electric fireplace provides an aesthetic feature, and it may add warmth to the space.
Granny Flat Design Examples
To spark your creativity and gather inspiration for your granny flat design, explore various examples and floor plans available online and in architectural publications. Websites like Pinterest and Houzz offer a wealth of ideas for granny flats of different styles and sizes.
When reviewing these examples and exploring floor plans, consider the following:
Number of bedrooms and bathrooms: Determine the number of bedrooms and bathrooms needed based on the intended occupants and their lifestyle.
Layout and flow: Ensure the layout is functional and allows for easy movement between spaces, considering the needs of the occupants.
Size and dimensions: Choose a floor plan that fits comfortably within the available space and meets local regulations, while also providing adequate living space.
Here are a few examples of inspiring granny flat designs:
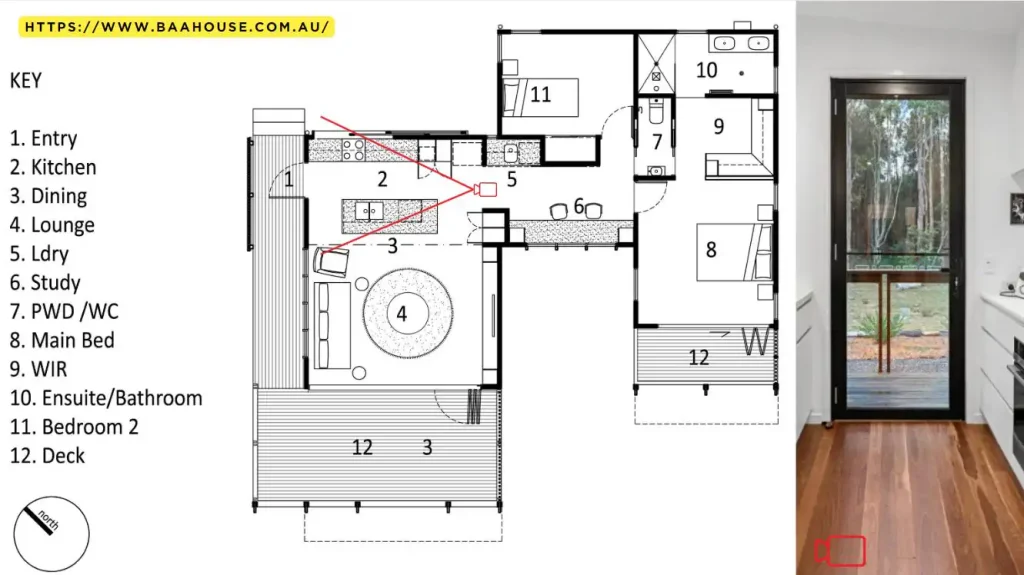
Samford Valley Small House: Designed by Baahouse + Baastudio, this granny flat embraces a tropical aesthetic with generous decks that seamlessly connect the indoor and outdoor living areas. Courtesy goes to Baahouse and Baastudio.

Strong points on Baahouse + Baastudio’s floorplan:
By analyzing the granny flat plan for its strengths you can see the open-plan design integrated with the kitchen, dining, and lounge. This creates a unified, spacious living area. The large deck connects seamlessly to the main living areas, extending the usable space and promoting indoor-outdoor living. When designing your granny flat, you can try and “borrow” ideas from other floorplans; for example, Baahouse has done great work with arranging the two main zones connected by study – brilliant idea!
Here how it works – for better noise management position the study near the entry, providing a separate, quiet space. Locate the laundry near the main living area. Include a separate powder room/WC, beneficial for guests.
Place the main bedroom with a walk-in robe and ensuite for privacy as they did. A second bedroom should be on the other side of the layout, as far away as possible for best privacy. The two bedrooms open to an outside deck, integrating the living space with outdoors.
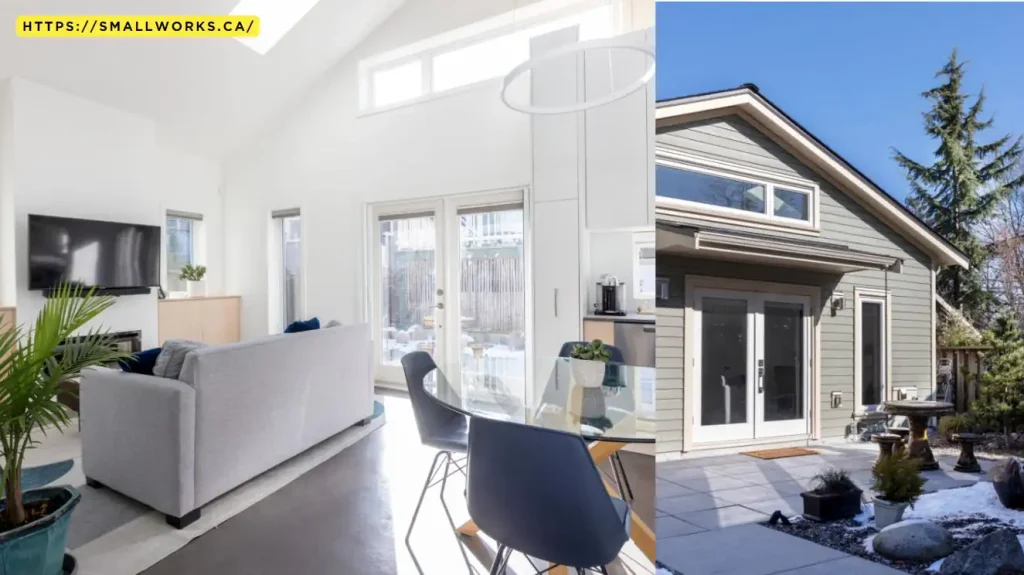
Vancouver Granny Flat: This bright and airy two-bedroom granny flat by Small Works features lofted ceilings and an abundance of windows, creating a sense of openness and connection to the outdoors. At TALLBOX we love this project, it’s one of the best in its class among the 30 architects we researched. Courtesy goes to Small Works.
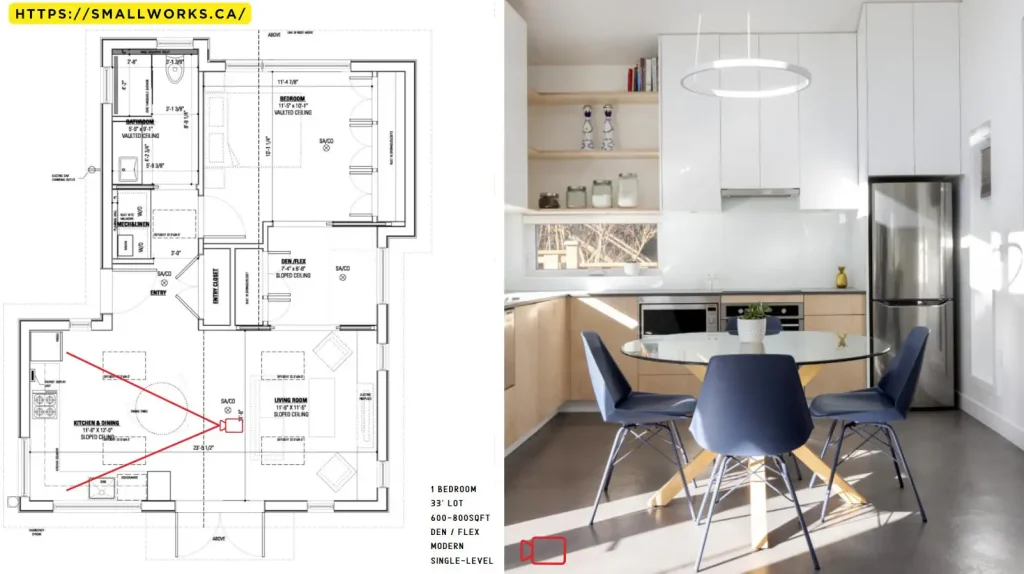
Key points from Small Work’s floorplan:
Plan your granny flat with a clear entry leading to a central entry closet. Design the bathroom to the left, with a wall-mounted toilet and a 5′-9″ x 4′-1″ footprint, be sure to have a vaulted ceiling in there. Include a mechanism and linen area (W/D) within 3′ of the bathroom.
Plan for a 11′-6″ x 12′-0″ open kitchen and dining area, note the slanted ceiling, and integrate a dining table and kitchen island. Create a separate living room 11′-6″ x 11′-5″ with a slanted ceiling, and include an electric fireplace.
Include a flexible den/office 7′-4″ x 8′-8″, plan a slanted ceiling, ensure storage/closets space. Place the bedroom, a good sized space, at 11′-5″ x 10′-1″ with a vaulted ceiling, and allow room for adequate storage space in closets. Ensure multiple skylights throughout the floor plan for ample light.
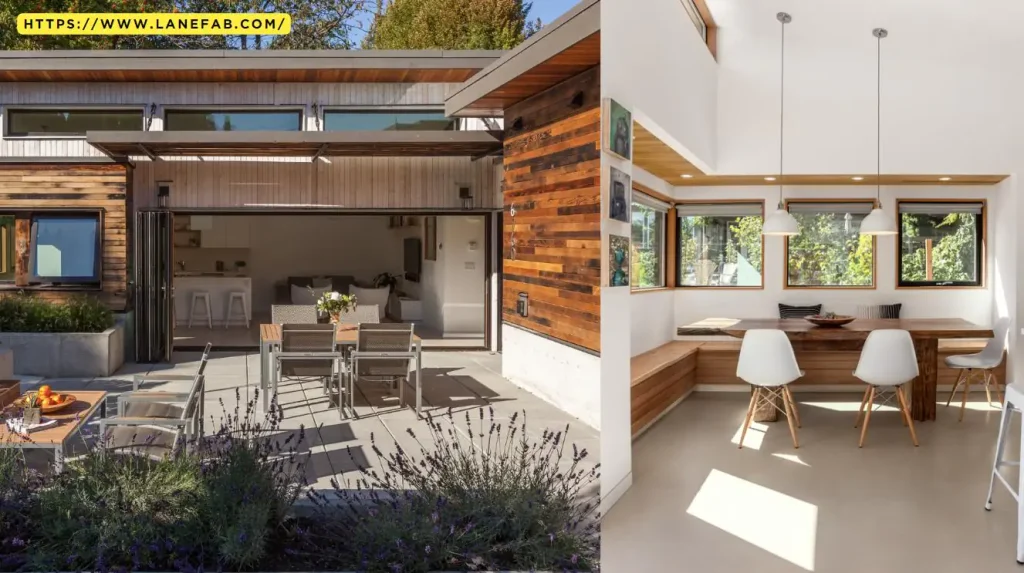
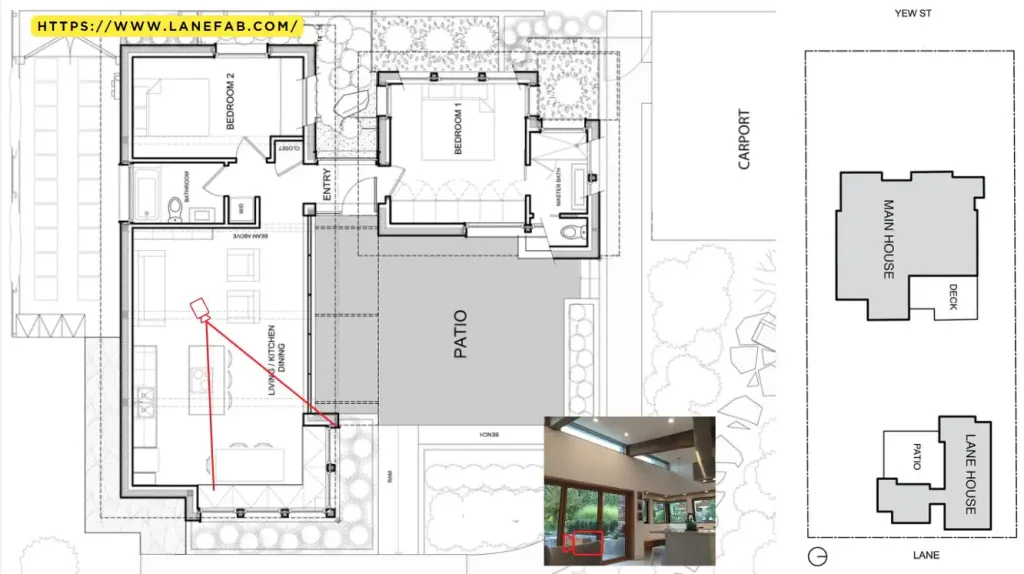
LaneFab’s Open and Modern Granny Flat Design: This contemporary design features clean lines, natural colors, and accordion doors that open to the outdoors, blurring the boundaries between indoor and outdoor living. Courtesy of Colin Perry / Lanefab.
Key points from LaneFab’s floorplan:
Okay, so when you’re thinking about your granny flat design, take a good look at this plan – it really nails some key areas.
Prioritize an open-plan living/kitchen/dining area for spaciousness and flow. Create seamless access from the living area to the patio, expanding the usable space, exactly as the team from LaneFab did.
Ensure privacy by separating the main bedroom with an ensuite and placing it away from the living areas. Position the second bedroom with its own bathroom for guest comfort. Make a central entry point that flows logically to all parts of the house.
Keep laundry and service areas close to bathrooms for convenience. Design a dedicated, accessible patio as a key living component. These features create a comfortable and functional granny flat.
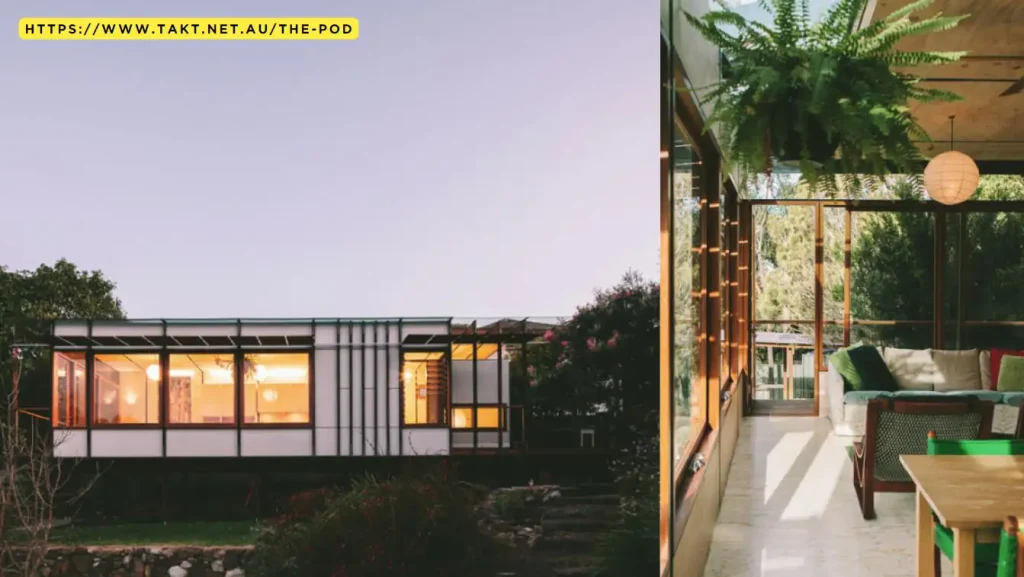
The Pod: This modern and minimalist design by Takt Architecture Studio features a large skylight that floods the space with natural light and an open floor plan that maximizes the sense of spaciousness. Photography by Shantanu Starick.
How to think when doing layout for granny flats?
When planning the layout of a granny flat, there are several important factors to consider to ensure the space is functional, comfortable, and meets the needs of its occupants .
Size and Layout:
Occupants and Needs: Determine the number of people who will be living in the granny flat and their specific needs. This will help you decide on the number of bedrooms, bathrooms, and the overall size of the unit .
Flow and Functionality: Consider how the space will be used and how people will move through it. Ensure there is enough room for essential activities like cooking, dining, and relaxing, and that the bathroom is easily accessible .
Storage: Incorporate built-in storage solutions, such as wardrobes, shelves, and cabinets, to maximize space and minimize clutter .
Maximizing Space:
Multi-functional Furniture: Choose furniture that can serve multiple purposes, such as a sofa bed or a fold-out dining table, to make the most of the available space.
Vertical Space: Utilize vertical space on the walls with shelves and cabinets to increase storage options.
Open Floor Plan: An open floor plan can make a small space feel larger and more inviting .
Accessibility:
Level Access: If the granny flat is intended for elderly relatives or individuals with mobility challenges, ensure level access, wide doorways, and grab rails in bathrooms.
Lighting: Ample natural light and well-placed task lighting are essential for safety and comfort.
Other Considerations:
Privacy: Consider the location of the granny flat on the property to ensure both the occupants of the main house and the granny flat have adequate privacy.
Aesthetics: Ensure the design of the granny flat complements the main property by using similar materials, colors, and architectural styles.
Resale Value: Think about how the layout might affect the resale value of your property in the future.
Materials and Construction Methods for Granny Flats
Materials
A wide range of materials can be used for granny flat construction, each with its own advantages and disadvantages in terms of cost, durability, maintenance, and aesthetic appeal. Some common options include:
Wood: Wood is a popular choice for its versatility, affordability, and natural beauty. It can be used for framing, cladding, and interior finishes.
Steel: Steel is a durable and strong material that is resistant to fire and pests. It can be used for framing and cladding, offering a modern and robust aesthetic.
Concrete: Concrete is a versatile material that can be used for foundations, walls, and floors. It is known for its durability and fire resistance.
Brick: Brick is a classic and enduring material that offers good insulation and soundproofing qualities. It can be used for exterior walls, providing a traditional and timeless look.
Cladding: Cladding materials such as wood, Colorbond steel, and aluminum can be used to protect the exterior of the granny flat from the elements while also enhancing its visual appeal.
When choosing materials for your granny flat, consider also
Durability: How well will the material withstand the local climate and the wear and tear of daily use?
Cost: What is the upfront cost of the material and the long-term cost of maintenance?
Maintenance requirements: How much upkeep will the material require over time?
Aesthetic preferences: Does the material complement the style of the main house and your personal preferences?
Energy Efficiency and Sustainability Considerations
When designing your granny flat, consider incorporating energy-efficient and sustainable features to minimize your environmental impact and reduce long-term operating costs. Some options include:
- Insulation: Use high-quality insulation in walls, ceilings, and floors to reduce heat loss and gain, improving energy efficiency and comfort.
- Windows: Install energy-efficient windows with double or triple glazing to minimize heat transfer and reduce reliance on artificial heating and cooling.
- Orientation: Position the granny flat to maximize natural light and passive solar heating, reducing the need for artificial lighting and heating during the day.
- Solar panels: Consider installing solar panels to generate renewable energy, reducing your reliance on fossil fuels and potentially lowering your energy bills.
- Water conservation: Incorporate water-saving fixtures and appliances, such as low-flow toilets and showerheads, to reduce water consumption.
- Sustainable materials: Choose building materials that are recycled, renewable, or locally sourced to minimize the environmental impact of construction.
By incorporating these features, you can create a granny flat that is not only comfortable and functional but also environmentally responsible.
Construction Methods For Granny Flats
There are two primary construction methods for granny flats on-site and off-site.
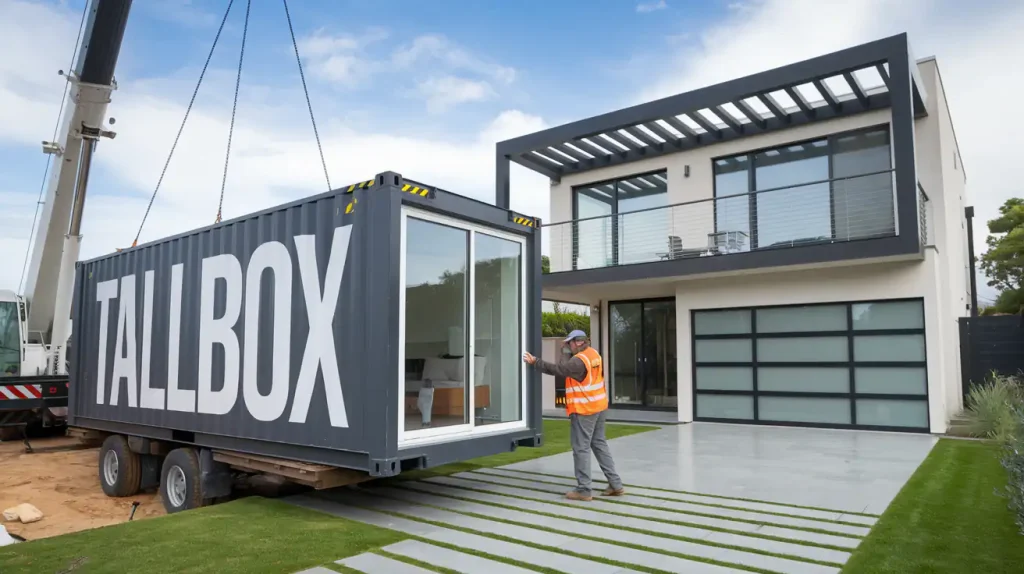
On-site construction involves building the granny flat from scratch on your property. It allows for greater customization and flexibility in design, but can be more time-consuming and disruptive to your daily life. While off-site construction involves building the granny flat in a factory and transporting it to your property. It can be a faster and less disruptive option, but may offer less flexibility in design.
The choice of construction method will depend on your budget, timeline, and design preferences.
Before starting any construction, it’s crucial to have a clear understanding of your needs and to ensure that your plans comply with all relevant regulations.
This includes identifying the intended purpose of the granny flat, familiarizing yourself with local zoning ordinances and building codes, and consulting with local authorities or a professional architect for guidance.
What are the steps to construction a granny flat on site?
This is a general overview of the on-site construction process. Depending on the method of building, it may take 3 to 9 months to complete the granny flat project.
The specific steps and timeline may vary depending on the complexity of the project, the chosen materials, and local regulations. It’s essential to work with qualified professionals and consult with local authorities throughout the process to ensure a successful and compliant granny flat construction.
There are 14 steps in the construction process of a granny flat (on-site) and these involves a series of steps that require careful planning and execution.
Site Preparation:
Clear the site: Remove any existing structures, vegetation, or obstacles that may interfere with construction.
Level the ground: Ensure the site is level and stable to provide a solid foundation for the granny flat. This may involve excavation and compaction of the soil.
Plan for drainage: Consider the slope and drainage patterns of the site to prevent water damage and erosion. Install proper drainage systems as needed.
Address existing structures: If the granny flat is being built as an addition to an existing structure, address any issues with that structure before construction begins. This may include repairs, upgrades to electrical or plumbing systems, or reinforcing the foundation.
Foundation:
Choose the right foundation type: The appropriate foundation type depends on factors such as soil composition, granny flat design, size, and intended use. Common options include slab, pier, or other systems.
Excavate and pour the foundation: Prepare the foundation according to the chosen type and ensure it meets local building codes and regulations.
Framing
Erect the structural framework: Construct the walls, floors, and roof frame of the granny flat using materials like wood or steel.
Ensure proper structural integrity: Ensure the framing is sturdy and meets all safety and building code requirements.
Windows and Doors
Install windows and external framing: Install windows and doors according to the design and ensure they are properly sealed and insulated.
Consider egress requirements: Ensure windows in bedrooms meet egress requirements for fire safety.
External Walls
Apply external wall materials: Apply the chosen external wall materials, such as brickwork, cladding, or siding.
Consider weatherproofing: Choose materials that provide protection from the elements and ensure proper sealing and flashing to prevent water damage.
Roofing
Install roofing materials: Install the chosen roofing material, such as Colorbond metal roofing or tiles.
Ensure proper drainage: Ensure the roof is designed to effectively drain rainwater and prevent leaks.
Plumbing and Electrical Rough-In
Install plumbing and electrical systems: Install the rough-in plumbing and electrical wiring throughout the granny flat.
Ensure compliance with codes: Ensure all plumbing and electrical work meets local building codes and regulations.
Insulation
Insulate walls, ceilings, and floors: Install insulation to improve energy efficiency and comfort.
Consider different insulation types: Choose appropriate insulation materials based on climate and building design
Internal Fit-Out
Install internal walls and partitions: Complete the interior framing and install drywall or other wall finishes.
Install flooring: Lay the chosen flooring material throughout the granny flat.
Plumbing and Electrical Fixtures
Install plumbing fixtures: Install sinks, toilets, showers, and other plumbing fixtures.
Install electrical fixtures: Install light switches, outlets, and other electrical fixtures.
Painting and Finishing
Paint walls and ceilings: Apply paint or other finishes to the interior walls and ceilings.
Install cabinetry and trim: Install kitchen cabinets, bathroom vanities, and other trim work.
Final Touches:
Complete any remaining details: Install appliances, window coverings, and other final touches.
Clean up the site: Remove any construction debris and ensure the site is clean and tidy.
Final Inspections
Schedule inspections: Schedule necessary inspections with local authorities to ensure compliance with building codes and regulations.
Certification and Handover
Obtain final certification: Obtain the necessary certificates of occupancy and other approvals.
Handover the granny flat: Once all inspections and certifications are complete, the granny flat is ready for occupancy.
What to consider when hiring granny flat firm?
When designing your granny flat, consider incorporating energy-efficient and sustainable features to minimize your environmental impact and reduce long-term operating costs. Some options include:
- Insulation: Use high-quality insulation in walls, ceilings, and floors to reduce heat loss and gain, improving energy efficiency and comfort.
- Windows: Install energy-efficient windows with double or triple glazing to minimize heat transfer and reduce reliance on artificial heating and cooling.
- Orientation: Position the granny flat to maximize natural light and passive solar heating, reducing the need for artificial lighting and heating during the day.
- Solar panels: Consider installing solar panels to generate renewable energy, reducing your reliance on fossil fuels and potentially lowering your energy bills.
- Water conservation: Incorporate water-saving fixtures and appliances, such as low-flow toilets and showerheads, to reduce water consumption.
- Sustainable materials: Choose building materials that are recycled, renewable, or locally sourced to minimize the environmental impact of construction.
By incorporating these features, you can create a granny flat that is not only comfortable and functional but also environmentally responsible.
So, how to design a granny flat?
Plan your granny flat meticulously. Understand estimated costs, and research local regulations. Prioritize accessibility, privacy, and functionality. Explore diverse design examples. Integrate energy-efficient features to enhance the living space and your property value. Begin with a clear vision for the granny flat’s purpose and occupants.
Let this guide design decisions for a functional and comfortable outcome. Seek expert advice from architects, builders, and local authorities. This ensures a successful project. With meticulous planning, your granny flat will provide flexible living space for years.
Can TALLBOXDESIGN do 3D renderings for granny flat?
In short, Yes, TALLBOXDESIGN can create 3D renderings for your granny flat project.
TALLBOXDESIGN specializes in 3D design and rendering for accessory dwelling units (ADUs), which includes granny flats. They can help you visualize your granny flat project before construction begins, allowing you to explore different design options and make informed decisions. You can request a rendering quote on their website to get started.
Want to get 3D rendering for your granny flat project?